Fusion Basics - Design
This document will overview the basic functions and buttons that can be used in the "Design" workspace in Fusion 360.
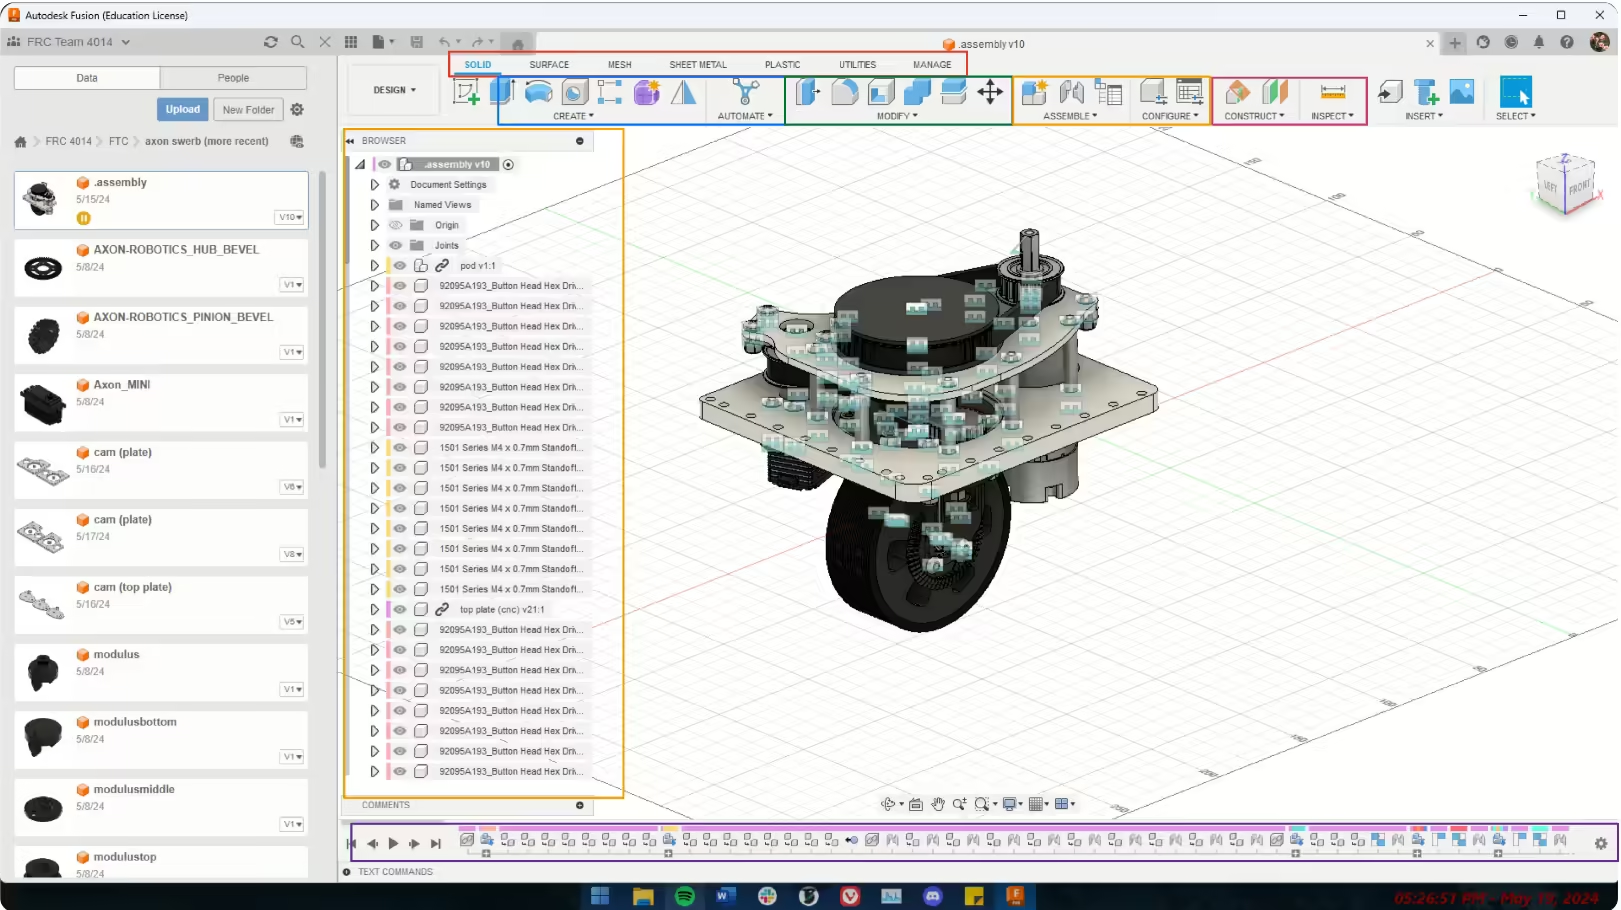
Below is a picture of what you will see initially in the Design Workspace. Note that workspaces can be changed by clicking the button near the top left that says "Design".

Starting with the easiest, there are multiple "tabs" within this workspace. To switch between tabs, click the different tabs (boxed in red), such as "Solid", "Surface", etc.
Ima be honest with you the only two I've used are "Solid" and "Mesh". I will outline how to use the Solid tab later, but Mesh is basically only used to import STL's.
Create Category - BLUE
The gist of the Create Category is to create a body initially.
The button at the most left of this category is Create Sketch. It has its own workspace, so I will talk about that later.
The extrude and revolve buttons (the ones to the right of the Create Sketch) makes a new body or a new component, which are the foundations of design stuff.
To the right of that is the create hole button, which as you might have guessed, creates a hole in a body.
The one to the right of that and the one at the end are Rectangular Pattern and Mirror respectively, which duplicate a body in their own ways. The rectangular pattern follows 2 axes and duplicates the selected body a specified amount of times throughout a specific distance. Mirror duplicates a body over a mirror plane (and mirrors it ikr shock).
If you click the drop down, you can see more options and shortcuts like creating common shapes like rectangular prisms or wtv
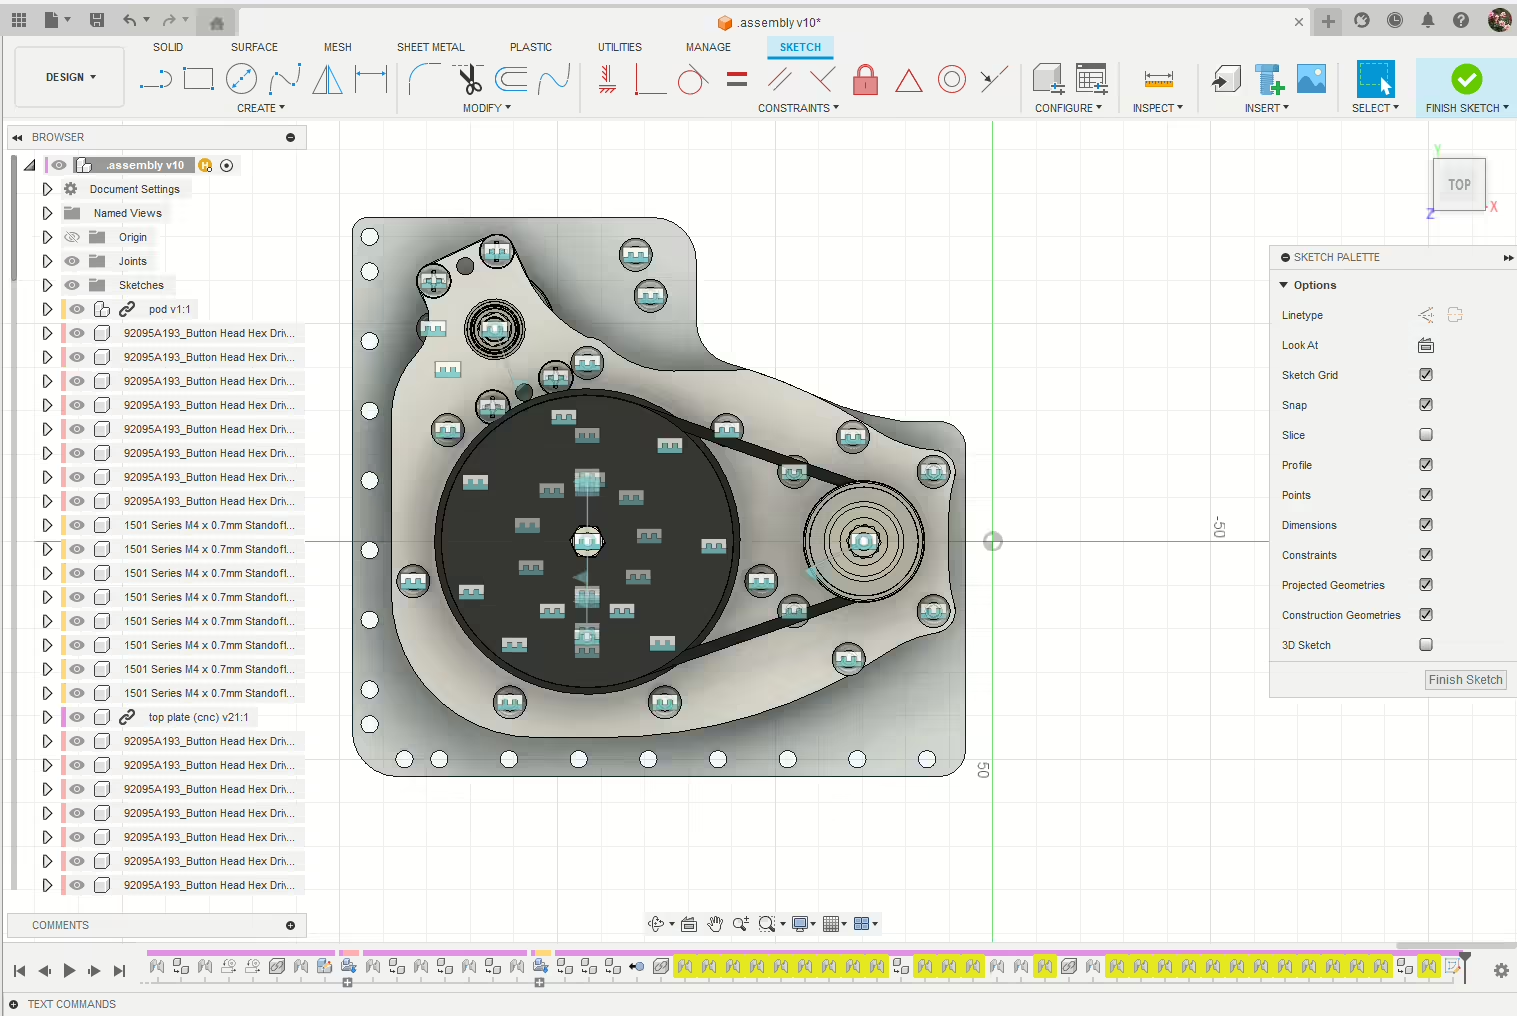
Sketch Workspace

The create tab here helps you create lines, rectangles, circles, arcs, splines, whatever your heart imagines!!
The modify tab is pretty similar to the modify category below, except with "trim" which deletes portions of sketch that you created.
Constraints here help keep your sketches in shape, especially when you are changing parameters. This makes it so that sketches change as you want. If the line turns black, that means it is fully constrained and will not change. More info can be found on Fusion's documentation.
Everything else is de same i think. Click Finish Sketch at the top right to finish the sketch.
Modify Category - GREEN
The gist of the Modify Category is to modify a body that was created in the Create Category.
The button at the most left of this category is Press Pull. It can press or pull any surface, even curved ones, and make them thicker or thinner.
The one to the right of that is fillet, which makes a sharp point curvy so its less sharp and easier to be machined. Chamfer, which is hidden in the drop down, is similar to this but it makes it so that it is a ramp down, which is better for 3D Printers.
The one to the right of that is shell, which makes the inside of a body hollow.
The one to the right of that is split body, which splits a body in multiple pieces using planes.
The last one is move, which moves things.
There are many others found inside the drop down, but some notable ones are Appearance and Change Parameter, which change how the body looks and changes the parameters.
Protip: Parameters are useful variables that are useful if you are not sure of a dimension. You can move on with your design and change the parameters later. These parameters can take the place of most values.
Assemble Category - GOLD
The Assemble Category deals with multiple components.
Each different thing in the Browser at the left of the workspace is considered a different component. These components may be imported from another design or created within this design. The one with the chain looking thing are "linked", which means they will update when another external component is modified.
The most useful thing in this category is Joint, which is the second from the left, which can define the relationships between components, such as securing them to one another or defining a revolution along an axis.
Construct and Inspect Category - Magenta??
The Construct and Inspect categories aide by providing miscellaneous tools to help with designing.
The construct category provides numerous different planes, axes, and points that can help with all the above categories.
The inspect category provides tools to help inspect the design, such as measure, interference, center of mass, section analysis, etc, accessibility, etc.
Timeline - Burple
The thing at the bottom of the screen is called the timeline. It records everything you do, so that you can go back and change it if you desire. This is realyl really reallyelalrleyllrealyl really really helpful.
Conclusion
This document was created by Han Lu, CO2027 Stanford OHS.
DM me on Discord(han_0427), Pronto (Han Lu), or email(han0427@ohs.stanford.edu) if you have any questions.
This document was created for FRC Team 4014, The Pixelators for internal use. Feel free to use this even though you are not part of our team, but please consider joining our Discord Server.
Y'all will slay fr