Useful CAD Models
Here are some common things that we use that don't have CAD models so u have to make them yourself.
The reason for creating this document was cuz alistair was like make a bumper and im like WHAT???? so now im writing a doc to explein to the younglings 💀
Metal Stock
From "Parts We Use", you learned that we usually use 2in x 1in metal stock. Here is how to make dat.
- Create a sketch, and make a rectangle with a side with 2 inches and the other side with 1 inch.
- Offset this rectange inwards 1/8 (0.125) inches.
- Extrude this sketch profile (between the first rectangle and the offsetted rectangle) to your desired length. It might be useful to paramatarize this one specifically, as it might change (e.g. type in distance box "barLength=15", and you can modify this in modify-> change parameters).
- Make any subtractive modifications you need to this bar!!
- Repeat for 1x1 stock, except the first rectangle would be 1 inch by 1 inch.
For structural bars where you need screw space, you can make a standard grid by doing the following:
- Create a sketch on one of the large faces on the bars u created above
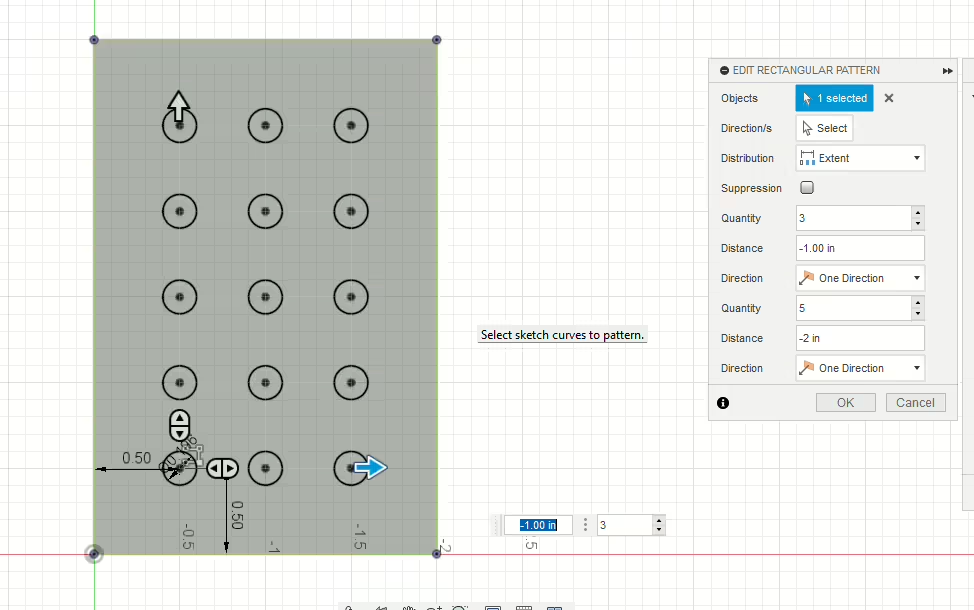
- Create a center-diameter circle with the center 0.5 inches from side (use dimension to do this), with diamter of 0.196 inch (a.k.a. #10 screw) as pictured below.
- Create a rectangular pattern (under the create drop-down) and make it go 1 inch less than your bar length in one axis and and same for the other one. (e.g. if your sketch planed face is 3in x 2in, you would enter 2in for one and 1in for the other rectangular pattern)
- For the quantity, keep changing it until the centers are 0.5in apart (they should align with the slightly thicker grid lines if u cahnge units to inches). See picture below.

- Now extrude these circles so that it goes through to the other side (u can just click the other side and it will snap). Repeat this for all the other sides u want to have holes on. This is useful cuz most compoennts are designed with these holes in mind.
yay bar done!!!
Bomper
Every year, we are required to have a bumper so that its like safe or smth idk.
It has 2 parts: the wood and the floof.
The floof part is not required to model, so I will teech how to make wood part.
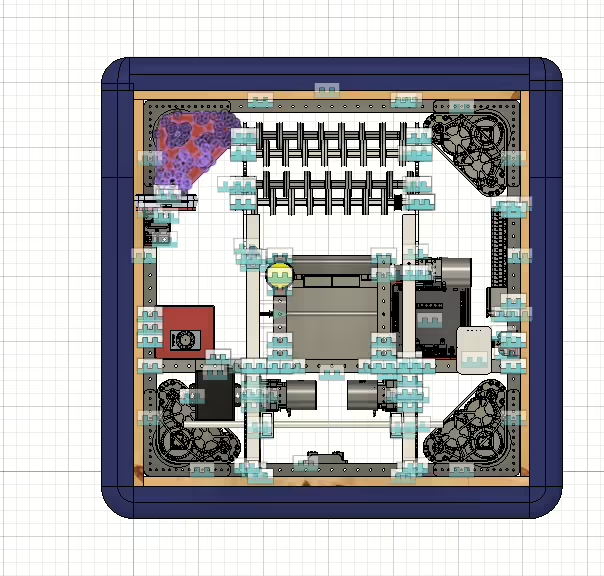
- The bumper is supposed to go around the bot, so project the frame perimeter of the robot.
- Then, offset it by 0.75 inch (wood is usually 3/4'' thick, give or take).
- Divide it so that each piece of the wood is joined by "butt joint", see picture below. We make it like this to increase structural integrity and to make it easier to fab, as every piece of wood would be the same length.
- Extrude it according to the year's bumper requirements found in the game manual.
Here is an example of the bumper. 
Yay we can bump people fr!!!
Conclusion
I'll add more stuff next year if i get confused with anything. Feel free to message me if u have any questions so I can add it to this documentt as well <33
This document was created by Han Lu, CO2027 Stanford OHS.
DM me on Discord(han_0427), Pronto (Han Lu), or email(han0427@ohs.stanford.edu) if you have any questions.
This document was created for FRC Team 4014, The Pixelators for internal use. Feel free to use this even though you are not part of our team, but please consider joining our Discord Server.